To enable NFS on a Synology folder, access DSM, configure NFS settings in Control Panel, set permissions, and share selected folders.
Preparation for NFS Setup
Checking NAS Compatibility
Before setting up NFS (Network File System) on your Synology NAS, it's crucial to ensure that your device is compatible with NFS. Most modern Synology NAS models support NFS, but it's always wise to verify this. You can check the compatibility by visiting the Synology NAS Compatibility List on their official website. This list provides detailed information about the models and the specific features they support.
Updating Synology NAS Firmware
Ensuring your Synology NAS runs the latest firmware is vital for security, performance, and feature availability, including NFS support. To update the firmware, log into the DSM (DiskStation Manager), navigate to the Control Panel, and select the Update & Restore option. DSM will automatically check for the latest firmware and guide you through the update process. It's important to have a stable internet connection and to avoid interrupting the update process.
Understanding Network Requirements
Configuring NFS on a Synology NAS requires a stable network setup. Ensure your network hardware, like routers and switches, can handle the expected traffic without bottlenecks. Additionally, understanding network protocols, IP configurations, and subnetting can be beneficial. For optimal performance, consider a gigabit Ethernet connection and ensure your NAS is connected to a network that provides sufficient speed and stability for data transfer. More information about network setups can be found on the Network Configuration page on Wikipedia.
Enabling NFS on Synology NAS
Accessing DSM (DiskStation Manager)
To enable NFS on your Synology NAS, the first step is to access the DiskStation Manager (DSM). DSM is the operating system and user interface for Synology NAS devices. You can access it by entering the IP address of your NAS in a web browser. If you're unsure of the IP address, you can find it using the Synology Assistant tool, available on the Synology Download Center.
Navigating to Control Panel and File Services
Once logged into DSM, navigate to the Control Panel. Here, you'll find various settings to customize and control your NAS. Look for the 'File Services' section, which houses the settings for different file-sharing protocols, including NFS.
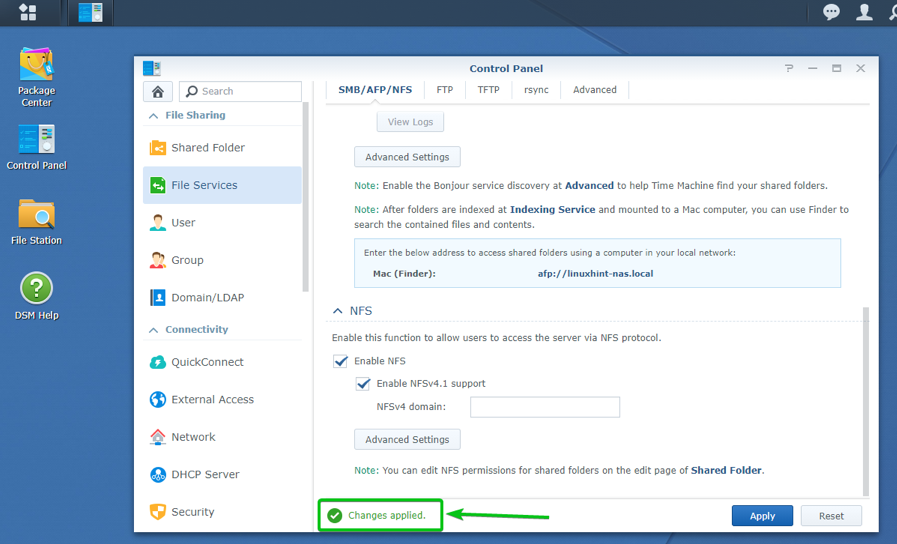
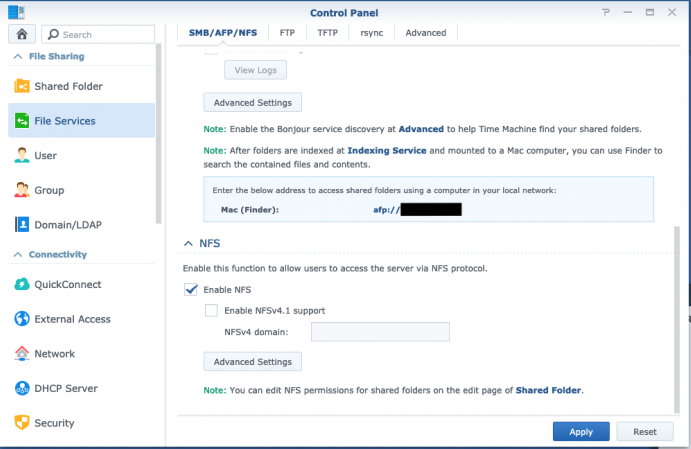
Enabling NFS Service
In the File Services section, you'll find a tab or option for NFS. Here, you can enable the NFS service by checking the appropriate box or toggling the switch. This action activates NFS on your NAS, allowing it to communicate using the NFS protocol.
Configuring NFS Permissions and Settings
After enabling NFS, it's important to configure the permissions and settings for security and accessibility. You can specify which IP addresses or networks have access to your NFS shares, set read/write permissions, and configure other advanced options like root squashing for added security. Familiarize yourself with NFS concepts and best practices by visiting the Network File System page on Wikipedia for more detailed information.
Creating and Configuring NFS Shares
Selecting Folders for NFS Sharing
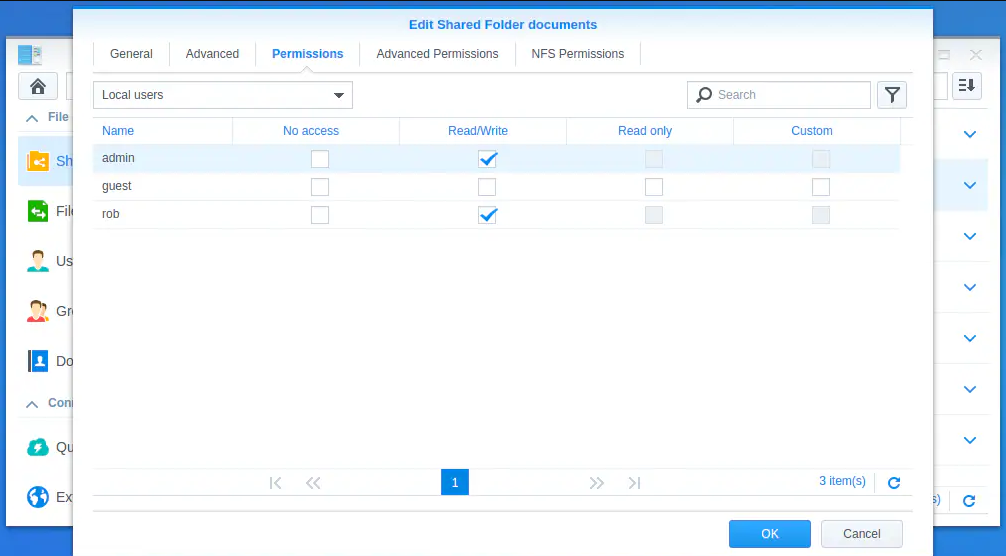
After enabling NFS on your Synology NAS, the next step is to select which folders you want to share over the network. In DSM, navigate to the 'Shared Folder' section in the Control Panel. Here, you can either create a new shared folder specifically for NFS or edit the properties of an existing folder to enable NFS sharing.
Setting Up NFS Permissions
For each shared folder, you need to set up NFS permissions. This involves specifying which users or devices can access the folder and what level of access they have (read-only or read-write). You can do this by editing the NFS permissions in the shared folder settings. It's crucial to strike a balance between accessibility and security when configuring these permissions.
Advanced NFS Settings (e.g., Squash, Asynchronous I/O)
Advanced NFS settings allow you to fine-tune how the NFS service operates. Key settings include 'root squash', which prevents root users on client machines from having root privileges on the NAS, and 'asynchronous I/O', which can improve performance by allowing the server to reply to requests before the data is actually written to disk. Understanding these settings is important for both performance and security, and you can learn more about them on the Asynchronous I/O Wikipedia page.
Connecting to NFS Shares from Client Devices
Configuring NFS Client on Windows
To access NFS shares from a Windows client, you need to install the NFS client feature. This can be done through the 'Turn Windows features on or off' section in the Control Panel. Once installed, you can connect to the NFS share using the mount command in the command prompt or by mapping the share as a network drive in File Explorer. Ensure you have the IP address of your NAS and the path of the NFS share.
Setting Up NFS on Linux Systems
Linux systems typically come with NFS client capabilities pre-installed. To connect to an NFS share, you can use the mount command with the NFS option. You'll need to specify the NAS's IP address and the NFS share path. For persistent connections, you can add the NFS share to the /etc/fstab file. Detailed instructions can be found in various Linux documentation and community forums, such as the Linux NFS wiki page.
Troubleshooting Common Connection Issues
Common issues when connecting to NFS shares include network connectivity problems, incorrect permissions, or misconfigured NFS settings on the NAS. To troubleshoot, check your network connection, verify the NFS share's IP address and path, and ensure the correct permissions are set. Logs on both the NAS and the client device can provide valuable information for troubleshooting.
Maintaining and Monitoring NFS Performance
Regular Maintenance Tips
Regular maintenance is key to ensuring optimal performance of your NFS setup on Synology NAS. This includes keeping the DSM and other software up to date, regularly checking the health of your hard drives, and cleaning up unnecessary files to free up space. Regularly rebooting the NAS can also help clear any temporary issues that might affect performance.
Monitoring Tools and Techniques
Synology NAS provides built-in tools for monitoring system performance, including Resource Monitor, which can be accessed through DSM. This tool gives real-time information about CPU, memory, and network usage, and can be extremely helpful in diagnosing performance issues. Additionally, consider using third-party tools for more detailed monitoring, especially if you are managing a larger network or multiple NAS devices.
Optimizing NFS Performance
To optimize NFS performance, consider network improvements like upgrading to faster switches or routers, using higher quality cables, or reconfiguring your network layout for efficiency. On the software side, tweaking NFS settings such as read/write buffer sizes and adjusting the number of allowed concurrent connections can also make a significant difference. More advanced techniques include implementing RAID configurations for faster data access and using SSD caching.
Security Considerations for NFS
Implementing Network Security Measures
When using NFS, it's vital to implement robust network security measures to protect your data. This includes using VPNs (Virtual Private Networks) for remote access, implementing VLANs (Virtual Local Area Networks) to segment your network, and ensuring that all network devices are secured with strong passwords and the latest firmware. Firewalls should be configured to only allow NFS traffic from trusted IP addresses.
Setting Up Firewall and Access Control
On your Synology NAS, configure the firewall to restrict access to your NFS shares. You can set rules to allow NFS traffic only from specific IP addresses or subnets, significantly reducing the risk of unauthorized access. Additionally, use the NAS's built-in access control lists to define which users or groups have permission to access specific shares.
Best Practices for Secure NFS Usage
To maintain a secure NFS environment, follow best practices such as regularly updating your Synology NAS and client devices, using secure protocols for file transfers, and regularly auditing your NFS shares for unusual activities. It's also advisable to keep backups of your critical data and use encrypted connections where possible. For more detailed information on securing network services, refer to the Network Security page on Wikipedia.
Troubleshooting and Support
Common Issues and Solutions
When working with NFS on Synology NAS, common issues include connectivity problems, slow transfer speeds, and permission errors. To troubleshoot these issues, start by checking the basic network connections and settings. Ensure that the NFS service is running properly on your NAS, and that your client device is configured correctly to connect to the NFS share. For slow transfers, check network hardware and the load on your NAS. Permission issues usually require a review of the NFS share settings and user permissions.
Accessing Synology Support
If you encounter problems that you can't resolve, Synology's support team can be a valuable resource. You can access support through the Synology official website. Here, you can find documentation, download software updates, submit support tickets, and access community forums. Synology also offers an extensive knowledge base with articles on common issues and troubleshooting steps.
Community Forums and Resources
For additional support, consider turning to the Synology community. There are numerous forums and online communities where Synology users share their experiences and solutions. These can be an excellent resource for real-world advice and troubleshooting tips. Popular forums include the Synology Community, Reddit’s Synology subreddit, and various technology forums with NAS-focused sections.


